


Now I think it’s time to roll up my sleeves and dive into this rustic Bougnat from Daniel Leader’s Local Breads. This is another bread from the prestigious Meilleur Ouvrier de France award winner Pierre Nury who hails from the Auvergne region of France. The only characteristics of this bread that actually resembles a French style, is the stiff levain that is used — and, of course, its award winner baker! All the other nuances I have gotten accustomed to in making French bread, the tight shaping, timing of the rises, scoring of the loaves… have been thrown out the window.
I have to admit to being a little intimidated when reading the description of this French rustic rye, a loaf that looks quite a bit like Italian ciabatta…especially the author’s caveat that “the high proportion of water in this dough makes it difficult to knead by hand.” But I was not going to let a little wet dough scare me off. It actually felt good to get loose, and play with some slack dough! While things are being turned upside down with this recipe, I might as well throw something else into the mix (no pun intended) and continue my experimentation with the autolyse process. Until now I have not been adding the levain to the initial mix of the flour and water. After reading Teresa’s second experiment in the autolyse process, I thought it could only give the dough a better structure, stronger development and maybe make it easier to incorporate the stiff levain into such wet dough. The hand mixing was a little sloppy to start…but after a short time the dough developed into a silky, smooth wet dough…and passed the window pane test with flying colors. The rest of the process went along smoothly with no other real predicaments… so after a couple of folds and a rise, it went into the regenerator for its long, slow overnight ferment.
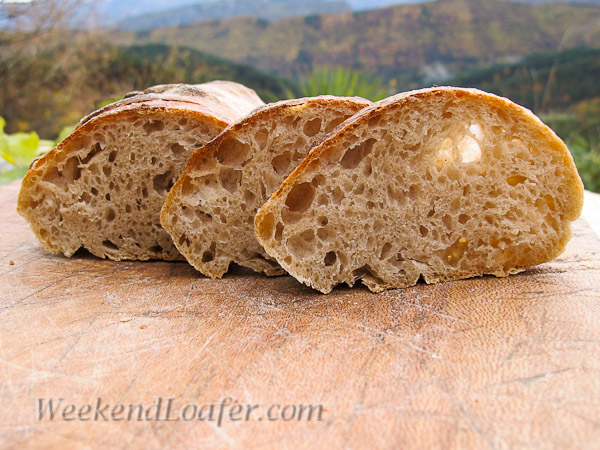
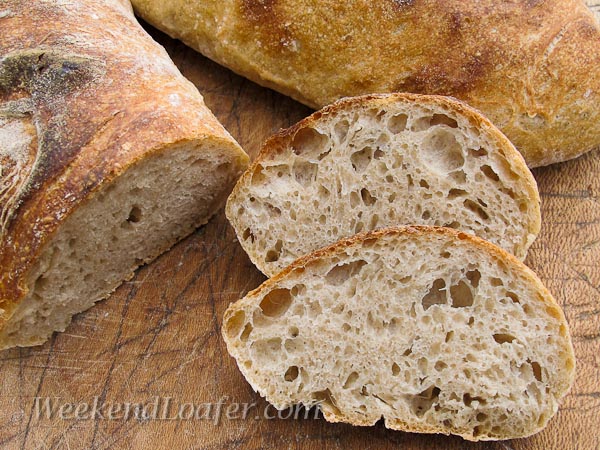
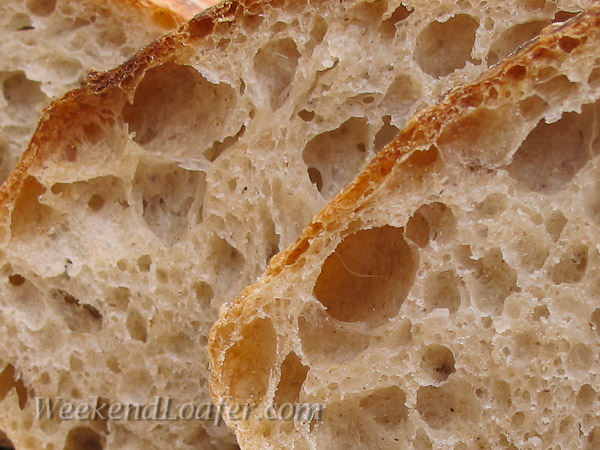
The next day I was eager to see what became of the dough… but I thought I’d give it the full twelve hours before I looked in. So, the hour approached, the timer went off for the moment of truth and I opened the refrigerator; I could not believe my eyes! The once little boule…had more than quadrupled in size, had reached the top of the bowl and was filled with lots of big gas bubbles. I gently turned out the dough, divided it and slipped it into the hot steamy oven. I really thought I had hit this one on the head! But this was not to be the case. The bread had a great creamy crumb, a subtle, slightly sour rye taste, a chewy crumb with a nice mouth feel and crackling crust … but where were those “long glossy tunnels” described by the author? I am not really sure what happened to all the gas pocket so evident when I turned it out…was the gluten structure not developed enough?…was it over proofed?… was it the Type 130 rye flour that I used?…. or maybe the Type 65 with its gluten additive was not strong enough to hold the gas? I have a sneaking suspicion that it was the coarse, heavy rye flour might have cut the glutens and causing the “long glossy tunnels” to collapse. The jury is still out on this one.
If you made it through to the end of this post…congratulations and thanks for reading! Now…seriously…Do you have any ideas on who stole my bubbles? Please leave me a comment. I would be very interested to hear your thoughts.
Pierre Nury’s Rustic Light Rye or Who Stole My Bubbles
Adapted from Daniel Leader’s Local Breads
Desired dough temperature 76°
Makes 2 Rustic loaves
Levain Starter:
- 45g stiff levain starter
- 95g unbleached bread flour preferably high gluten (I used Type 65)
- 5g stone-ground whole wheat flour (I used Type 150)
- 50 g tepid water
Ingredients:
- 450g unbleached bread flour preferably high gluten (I used Type 65)
- 50g Fine or medium rye flour (I used Type 130, sifted)
- 400g water
- 20g gluten de blé (optional)
- 125g stiff levain (do not use all of the starter from above; re-feed and store for next bake)
- 10g gray sea salt
Bread method:
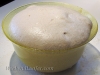
- Take your levain out of the refrigerator, weigh out the appropriate amount of starter and mash the levain with a whisk in a bowl with the water. Add the flour and stir with a spatula until it comes together. Turn out onto the work surface and knead to incorporate the flours. Place the levain in a covered container and let it sit at room temperature (70 to 76°) for 8-12 hours or until it has doubled in volume and the surface is domed.
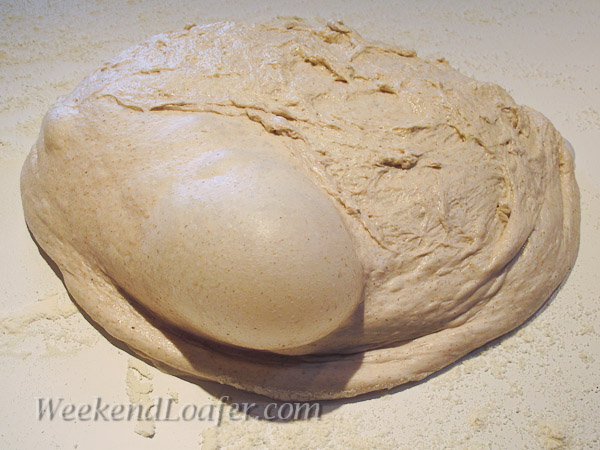
- Pour the water into a large mixing bowl or the bowl stand mixer. Combine the flours until all the ingredients are incorporated. Cover and let it rest for 20 minutes, while the flour hydrates and the gluten begins to develop. I could not fit my Kitchen Aid Pro in my suitcase, so I mix by hand… I autolyse/rest for one hour before adding the levain and salt, which really helps the gluten develop.( I experimented a bit…I added the levain to the initial mix and gave it an extended autolyse of one and a half hours.)
- Kneading By hand: Turn the dough out onto your work surface. I flatten the dough into a large rectangle; smear the levain on top of the dough. With floured or oiled hands knead a few strokes to fully incorporate the starter, flatten out the dough, evenly disperse the salt and continue kneading for 12 to 15 minutes. I use a combination of the French kneading technique and the method described here if the dough is really wet to start. For the first couple of minutes it will be a sticky mess on your work surface, but do not yield to the temptation of adding more flour. Stop occasionally and use your bench scraper to gather any stray dough from your work surface and your hands. Continue until you have a good gluten development. You should be able to gently stretch a piece of the dough into a thin membrane that you can almost see through without it tearing. By machine: Add the salt and levain and mix on medium speed until the dough cleans up the bowl and you reach a good gluten development.
- Transfer the rounded dough to a lightly oiled container. Cover and let it ferment at room temperature for one hour (70 to 75°). (I keep the dough at a consistent temperature 76° throughout.) Keep it covered till it is domed and doubles in volume. This should take about 1 hour depending on the proofing temperature. If you would like to get a good overall picture of the bread making process for the home baker, I highly recommend you check out Mark’s videos at the Back Home Bakery
- Gently scrape the dough out onto a lightly floured counter or, you can do this in your bowl. You can see this turning of wet dough by Susan at WildYeast or an artisan baker at Milawa Bakery. Cover the dough and let it rise for one more hour, and repeat with another fold. Allow the dough to expand for one or two hours more till it is twice the original size.


- Place the covered dough in the refrigerator and allow the dough to ferment slowly for 12 to 24 hours. Before baking, remove from refrigerator and let it sit on counter for two to three hours before dividing.
- About one hour before baking, preheat the oven to 500° with a baking stone in the middle and a tray in the bottom of the oven for steam. I like to add one cup of water to the bottom tray a few minutes before putting the loaf in the oven to produce a moist environment for baking the proofed loaf.
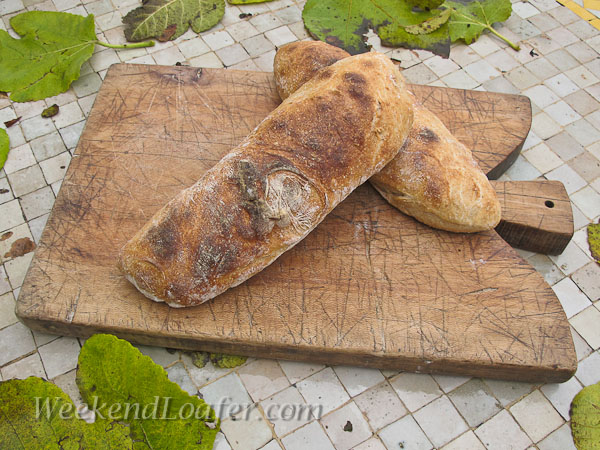
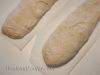
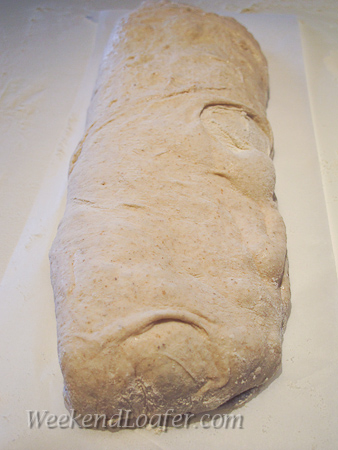
- Gently scrape the dough out onto a generously floured counter, trying not to fold the dough on itself to preserve structure of the dough. With floured hands, gently stretch/form the dough into an approximately a 10 inch square. With a floured bench scraper, cut the dough into two equal pieces. With floured hands swiftly lift the dough from both ends onto a piece of floured parchment paper. The rustic loaf should be approximately 12 inches long. Repeat with the other piece of dough.
- Slide the shaped dough (on the parchment paper ) onto the baking stone, add more ¼ cup of water for steam if necessary and turn down the oven to 450°, continue to bake for 20 to 30 minutes. Bake the loaves until they are an even golden brown.
- Remove loaf from oven with parchment paper. Let cool for at least one hour on a wire rack before digging in. I like to cover the cut end with a piece of plastic wrap secured with a rubber band and wrapped in a kitchen towel ,a piece of linen or place in a paper bag.
This is being sent to YeastSpotting at WildYeast